
The Order of Draw Series (Deep Dive): Part One - Blood Culture Bottles
This is the first post in our Order of Draw Deep Dive series, where we'll explore the history, science, and clinical significance of each tube type in the CLSI-recommended collection sequence.
by Shanise Keith • January 06, 2026
Why This Series Matters
Most phlebotomists can recite the order of draw. Blood cultures first, then light blue, then red, gold, green, lavender, gray. It’s drilled into us during training, tested on certification exams, and posted on collection station walls. But here’s the problem: knowing the sequence isn’t the same as understanding why it matters.
I see it constantly in online phlebotomy forums—practitioners who say “I always draw my red top first and I’ve never had a problem.” But here’s the unsettling truth: how would they know? When additive carryover contaminates a specimen, the lab doesn’t know you drew tubes out of order. They process what you send them. If a patient’s coagulation results are slightly elevated because EDTA contaminated the citrate tube, or if their glucose is falsely low because fluoride leaked backward into another specimen, the lab reports those results. The physician makes clinical decisions based on those results. The patient receives treatment based on those results.
You’ll never know you caused a problem—because the problem looks like the patient’s condition.
That’s what makes understanding the order of draw so critical. It’s not about following rules for the sake of rules. It’s about understanding the cascade of consequences that can follow when we don’t. Over the next several weeks, we’ll examine each tube type in detail—the history of its development, the chemistry of its additives, the testing it supports, and most importantly, why it sits where it does in the collection sequence. We’ll explore how decades of laboratory science, clinical research, and yes, preventable errors, shaped the protocols we follow today.
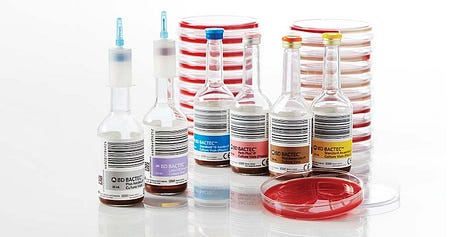
We’re starting at the very beginning of the order of draw: blood culture bottles.
Why Blood Cultures Come First
What you will read below is just the tip of the iceberg for all we could discuss about blood cultures, but we will save most of that for another time. What you need to know today, is that blood culture bottles hold the first position in the order of draw for a reason that’s both simple and profound: they must remain absolutely sterile. Unlike every other tube we’ll discuss in this series, blood culture bottles don’t just need to be clean or free from additive contamination—they need to be completely free from any microorganism that didn’t come from the patient’s bloodstream.
This isn’t a minor technical concern. Blood cultures are ordered when clinicians suspect sepsis or bacteremia—life-threatening infections that require immediate identification and treatment. False positive cultures (contamination from skin flora or the environment) can lead to unnecessary antibiotic treatment, extended hospital stays, and thousands of dollars in additional healthcare costs. False negative cultures (when organisms are present but killed by contamination or improper collection) can delay critical treatment and allow infections to progress.
Drawing blood culture bottles first, after following proper preparation, minimizes the risk that our hands, the needle, or the tube stoppers have picked up microorganisms from the environment. Every tube we touch after disinfecting the site is another opportunity for contamination. Blood cultures go first because they get the cleanest draw.
A Brief History of Blood Cultures
The story of blood cultures parallels the development of microbiology itself. In 1881, Robert Koch first demonstrated that blood from infected animals could grow bacteria in culture media. By the early 1900s, clinicians were attempting to culture blood from human patients, but the process was crude—often involving manual inoculation of culture flasks at the bedside with limited success.
Early blood culture systems had devastating contamination rates. Some studies from the 1940s and 1950s reported contamination rates exceeding 10%—meaning one in ten “positive” blood cultures actually represented contamination rather than true infection. This made blood cultures nearly as dangerous as they were helpful, since physicians couldn’t reliably distinguish true bacteremia from contaminated specimens.
The development of modern blood culture bottles in the 1960s and 1970s transformed the field. Manufacturers created closed, vacuum-sealed systems with pre-sterilized culture media that could be inoculated directly through a rubber septum, dramatically reducing environmental exposure. But the real breakthrough was in the media formulation itself, particularly the addition of sodium polyanethol sulfonate—better known as SPS.
So What’s Inside a Blood Culture Bottle?
The SPS Revolution
SPS is a lab-made chemical compound that fundamentally changed blood culture success rates. Developed and introduced into blood culture media in the 1950s and 1960s, SPS does multiple critical things simultaneously:
It keeps the blood from clotting. SPS binds to calcium in the blood, which prevents clotting inside the bottle. This matters because if blood clots, bacteria get physically trapped inside those clots—like insects caught in amber. The bacteria can’t spread into the liquid culture medium where they need to be to multiply and get detected. Even if a patient has bacteria in their bloodstream, if those bacteria are stuck in a clot, the culture will come back negative.
It disarms the immune system. This is where SPS becomes truly revolutionary. Think of it this way: your blood is a battlefield. Even after we draw blood into a bottle, the patient’s immune system keeps fighting. White blood cells continue trying to eat bacteria like tiny pac-men. Proteins in the blood act like soldiers, attacking and killing bacteria. Antibiotics the patient is taking are still active in that blood sample, working to destroy organisms.
SPS essentially calls a ceasefire. It stops the white blood cells from eating bacteria. It inactivates those protein soldiers. It even neutralizes some antibiotics. This gives bacteria that might be present in very low numbers a fighting chance to survive and grow in the culture bottle—which is exactly what we need to identify what’s making the patient sick. This is especially critical when we’re collecting cultures from patients who’ve already started antibiotic therapy.
It neutralizes natural bacteria-killers in blood. Blood contains various substances that naturally inhibit bacterial growth—it’s part of how our bodies protect us. But when we’re trying to grow bacteria in a culture, those protective substances work against us. SPS neutralizes these inhibitors, creating an environment where even small numbers of organisms can multiply to detectable levels.
The standard concentration in most blood culture bottles is 0.025% to 0.035% SPS. This concentration was determined through decades of research to maximize bacterial recovery while avoiding concentrations high enough to inhibit growth of certain bacteria (some organisms can be inhibited by SPS concentrations that are too high).
Before SPS, blood culture media used various anticoagulants like sodium citrate or heparin, but these didn’t provide the antimicrobial neutralization that SPS offers. The addition of SPS to blood culture systems in the 1960s significantly improved recovery rates for bacteremia, particularly in patients who had already received antibiotics before cultures were drawn.
Those Mysterious Beads
If you’ve ever looked closely at blood culture bottles, you might have noticed small beads or plastic balls floating around in one of the bottles—typically the aerobic bottle. They are kind of mesmerizing to watch when you turn the bottle upside-down. These resin beads are another innovation designed to improve bacterial recovery, especially in patients on antibiotics.
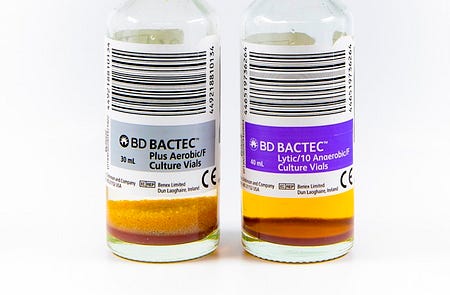
The beads act like tiny sponges that absorb antibiotics from the blood sample. While SPS neutralizes some antibiotics, it can’t eliminate them all. The resin beads provide extra antibiotic removal, giving bacteria an even better chance to survive and grow despite antibiotic therapy. They also absorb other substances in blood that might inhibit bacterial growth. How amazing is that?
Additionally, the beads increase the surface area inside the bottle. Some bacteria prefer to attach to surfaces rather than float freely in liquid media. The beads give these organisms more places to latch onto and multiply, improving detection rates for certain types of bacteria.
You’ll typically find these beads in aerobic bottles but not anaerobic bottles. This is because aerobic bacteria (organisms that need oxygen to grow) are more commonly targeted by the antibiotics patients receive, so they benefit most from the extra antibiotic removal. Anaerobic bottles (designed for organisms that grow without oxygen) rely more on the oxygen-free environment and the SPS to support bacterial growth.
The Nutrient Broth Layer
At the bottom of blood culture bottles, you’ll see a brownish-yellow layer. This is the culture media itself—essentially a nutrient-rich soup designed to feed bacteria and help them multiply.

Think of it like a buffet for bacteria. The culture media contains proteins, sugars, vitamins, and minerals—everything microorganisms need to thrive. These nutrients often come from ingredients like beef extract, soy proteins, or yeast extract, which is what gives the media its characteristic brownish-yellow color.
Different types of bottles have slightly different media formulations. Aerobic bottles have media optimized for organisms that need oxygen. Anaerobic bottles have media designed for organisms that grow best without oxygen. Some facilities also use specialized bottles for fungi or mycobacteria, each with media formulated to support those specific types of organisms.
When you inoculate the bottle with the patient’s blood, any bacteria present in that blood sample enters this nutrient-rich environment. If the conditions are right (the right temperature in the incubator, the right oxygen levels for that type of bacteria, and enough nutrients), the bacteria will start multiplying. What might start as just a handful of bacterial cells in the patient’s blood can multiply into millions or billions of cells over 24-48 hours, producing enough growth to be detected by the lab’s automated blood culture systems.
The media also contains the SPS we discussed earlier, plus pH indicators that change color when bacteria produce acid or alkaline byproducts during growth. These color changes can give lab techs early clues about what type of organism might be growing, even before they run identification tests.
But even as the bottles improved, contamination remained a persistent problem. Studies throughout the 1980s and 1990s consistently showed that collection technique—particularly skin antisepsis and the order in which bottles were filled—had enormous impact on contamination rates.
The Science of Contamination
Here’s what we know about blood culture contamination from decades of research:

Skin flora is the primary culprit. Even after thorough skin preparation, organisms like Staphylococcus epidermidis and other coagulase-negative staphylococci persist in hair follicles and sweat glands. During venipuncture, these organisms can be introduced into the needle or onto the bottle septum. The first few milliliters of blood drawn are most likely to contain any organisms dislodged during needle insertion—which is why many institutions now use initial specimen diversion devices for blood cultures.
Environmental contamination accumulates. Every surface the needle touches, every time we handle tube stoppers, every moment our hands contact the collection equipment, we risk introducing environmental microorganisms. This is why blood cultures must be drawn first, before our gloves have touched multiple tube tops and before the needle has contacted any other surfaces. Many places require blood cultures to be drawn with sterile gloves, but that doesn’t eliminate all the possible ways to contaminate a blood culture.
Contamination has real consequences. A 2013 study in Clinical Infectious Diseases found that contaminated blood cultures resulted in an average of 3.4 additional days of hospitalization, $8,720 in extra costs per patient, and unnecessary antibiotic exposure. On a national scale, blood culture contamination costs the U.S. healthcare system hundreds of millions of dollars annually.
The Modern Standard: Why First Means First
Current guidelines from CLSI (PRE02) and the CDC place blood culture bottles at the very beginning of the order of draw, before any other tubes. This isn’t arbitrary—it’s the culmination of decades of contamination studies, outbreak investigations, and quality improvement initiatives.
When collecting blood cultures using evacuated tube systems, we’re instructed to:
- Perform meticulous skin antisepsis (and let it dry completely)
- Draw blood culture bottles first, before any other tubes
- Avoid touching the needle hub or bottle tops after disinfection
- Consider using initial specimen diversion devices to discard the skin plug
Some practitioners question whether blood cultures truly need to come first if you’re using good technique and fresh needles. The research says yes, absolutely. Studies comparing contamination rates when blood cultures are drawn first versus later in the sequence consistently show lower contamination when bottles are filled first. The reason is simple: even perfect technique can’t eliminate organisms from skin—it can only reduce them. The first draw gives us the cleanest possible specimen when using proper techniques, protocol, and equipment.
Setting Up the Series
Blood culture bottles earn their position at the start of the order of draw through a combination of critical clinical importance, contamination risk, and decades of evidence about collection technique. Their placement isn’t negotiable—it’s the foundation of reliable blood culture results.
But blood cultures are just the beginning. Next week, we’ll explore light blue top tubes and sodium citrate—and discover why coagulation testing is so sensitive to additive contamination that these tubes must come immediately after blood cultures in the collection sequence. We’ll trace the development of anticoagulation science, explore the chemistry of calcium chelation, and understand why even trace amounts of EDTA or heparin from other tubes can make coagulation results completely unreliable.
The order of draw isn’t random. It’s a carefully constructed sequence designed to protect patients from preventable harm. Understanding why each tube sits where it does makes us better collectors, better educators, and better advocates for patient safety.
Have you worked in a place where blood culture bottles were not drawn first in the order of draw? Feel free to share below.
Next in the series: Light Blue Top Tubes (Sodium Citrate) - The Delicate Science of Coagulation Testing
Related Posts and Information
overall rating: my rating: log in to rate